Thursday, November 1, 2012

Fall Views and Kitchen Progress

I know I promised a few (ok, more than a few) months ago that I would post pics later that day...and then I promptly forgot! Living in the house has been wonderful. Making it into our home is a dream come true.

As my better half said, we needed to have our smells in it -- our furniture, our cooking, our candles, etc. -- so now it even smells like home. 

With the beauty of fall upon us, we continue to work on the house, welcome guests and enjoy the beauty of southern Indiana.


And now, updates on the work!

The Kitchen

We've come a long way (baby) since we moved in.  

You may recall the before:


Here is the same view....the 'during,' taken this morning:


We still have some cabinets to put in, install backsplash, new appliances to obtain, wall to finish, cabinets to paint....

BUT....

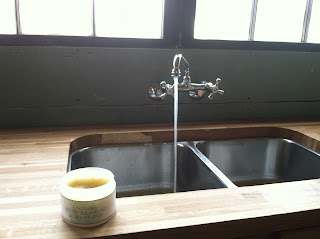
I can finally do dishes again in the kitchen!!!!


While originally we wanted to do custom, Amish-built cabinetry, we had to be practical and found some all wood, alder unfinished, shaker-style cabinets from a place in Louisville called Builder's Surplus. I will paint them myself. The countertop is oak butcherblock from Lumber Liquidators. We are using a beeswax-based salad bowl finish to seal it. The water just beads up and it gives the wood a slightly more rich tone. Since we used polyurethane on the new floor, I decided I wanted something more natural for the countertop. It is very easy to apply -- just wipe on, rub around a bit, and buff!

Speaking of the new kitchen floor....

the during.....

The boy even helped stain!

The after:


We obtained this 3/4" utility grade oak from Lumber Liquidators for less than $1/square foot and while there are some imperfections, it is rustic, which is exactly what we wanted. Everyone who comes in thinks it is gorgeous. We agree.  ;-)

As a reminder, here is the kitchen floor before:

This was the fateful day when we discovered the original yellow poplar kitchen flooring -- which we spent many hours on to remove layers and layers of old linoleum, Congoleum and newspaper -- was rotten and had to be completely torn out. sigh. Knowing that the entire floor, which Kevin rebuilt from (literally) the ground up, is sturdy and will last for generations to come feels really great!

I also realized that we never posted photos of the (nearly) finished bathroom...I will save those for the next post. 

~Ann

Monday, July 30, 2012

Oh, What a Beautiful Morning!

Woke up in the farmhouse this morning! Started the day with coffee by the fire with the Hubby, enjoyed the quiet together, watched the sun rise dark orange. Took a hot shower in the beautiful new/old bathroom and now sitting down to work in my office.

More details later with photos!

-Ann

Friday, July 20, 2012

Home Stretch!

We have been BUSY!  With that in mind, we will post pictures with brief explanations.

The bathroom floor. New 5" width walnut flooring:


A sneak peak at the bathroom colors:


The tub and sink back from their spa makeovers, ready to be installed in the bathroom:


The cool ceiling in Ann's office:


The front yard being trenched for the new electric:


Well, that's all for now. Another update soon, we promise!!!!

-Kevin & Ann

Monday, April 30, 2012

A Proper Update

It appears from our recent blog posts that we haven't given a proper update on the inside work on the house, so that is the purpose of this post.


The Lead Paint Issue
Instead of trying to remove the majority of the paint, we have chosen to go the encapsulation route, meaning, we will paint everything. Twice if necessary. After much research, we feel this is the best route for us to take from a budget and safety perspective.

Family Room


All of the wallpaper is down and the cracks have been patched. The old cement is off the chimney and we've picked the floor paint. Next project: sand the walls, paint walls and trim. Install wood beam the width of the room as we've discovered when someone walks upstairs, the ceiling bows and bounces. (yes, yikes!)  This is true for the living room as well. The beams will be laminated veneer so they are exactly straight and flat, and constructed based on the exact dimensions of the rooms within the house in order to account for the load-bearing walls. And they are surprisingly affordable compared to solid wood, not only hard to get a hold of these days, more expensive and has a tendency to warp over time -- which is our problem in the first place. We will box them in and paint them to match the trim. I'm excited about installing these beams for the support and stability it will give the house overall.  Maybe something funny to get excited about but here in tornado country, it's a pretty attractive project!

Here is the color scheme for the family room and living room:


And here is the family room chimney before and after...

Before:

After:


Looks much better, don't you agree?

I'm looking forward to getting the floor painted as the gray looks really great with the yellow walls and white trim! The paint is impressively sturdy -- it is industrial floor paint and will clean really well, but also shows a bit of character of the original floors.

Living Room


All of the wallpaper is steamed off the walls and ceiling.

Before:


BeforeAfter

BeforeAfter


 Of course, these 'After' pics are really 'During.'

The plaster patching and painting will happen after the new beams go in.

Kitchen


Most of the subfloor is in. The plumbing is in. The electrical will go in soon. We have a new window!!!
It's the one in the middle. :-)


We are still discussing how to handle the window on the right. Stay tuned!

Downstairs Bathroom


The plumbing is done, the subfloor is in, and we are in the process of refinishing the outside of our 1925 clawfoot tub. We will have a professional company come in to reglaze/refinish the inside but they don't do the outside. We have some special plans for the paint, but I don't want to share that just yet. I think the final "After" will be striking (IMHO) so I want to save that for effect.


As soon as the tub is finished, we will:
-- drywall and drop the ceiling about one foot,
-- put up the new wall with door (of course),
-- install the walnut hardwood flooring & poly it,
-- work on that hole where a window used to be (this room used to be an outside porch),
-- flip the electrical box around to the opposite side of the wall it is currently on,
-- paint, install new toilet, basin taps and medicine cabinet, towel bars, etc.

In order to move in, we need a kitchen of some sort and a full, working bathroom so that is our game plan right now.


Stay tuned! There will be a lot of activity in the next few months!

-- Ann

Monday, March 5, 2012